 Insulation blankets are protective covers for mechanical components like valves, pumps, heat exchangers and turbines. They are made with thermal insulation materials that can withstand industrial conditions and are designed to perform multiple functions, from regulating operating temperatures (they slow thermal energy transfer) and providing wear and tear protection to maximizing efficiency and providing acoustic protection against noise pollution. Without proper protection, machinery is susceptible to wear and tear, overheating, and freezing.
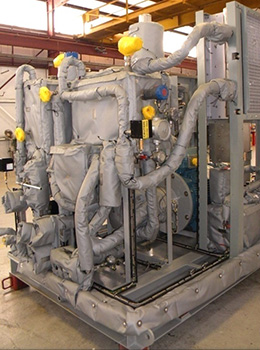
Each insulation blanket is custom-made, guaranteeing protection for components of any shape or size, and adheres to OSHA noise requirements. We see them used most often in a handful of industries, including oil and gas, agriculture, and power generation.
These removable insulation covers keep components like valves and pumps covered but accessible, and they are simple to install and maintain. But how exactly do you install them? Follow along with our four-step process.

1. Survey the area.
Before you install removable insulation blankets, get familiar with your surroundings. Any project has hazards and risks, and this installation is no exception. Start by identifying any obstructions that could hamper your plans and prepare to pivot accordingly.
From here, get ready to work by gathering protective equipment to do the job. You might need:
- Burn protection: It only takes a few seconds for your skin to burn after touching a hot surface, and people can typically handle five seconds at 140 degrees before sustaining injury. It is good safety practice to install removable covers with the system cooled down. However, if you must install covers on a hot system, you can mitigate burn potential with equipment such as FRC clothing and safety gloves.
- Fall protection: To install insulation blankets, you might have to work in awkward positions, including those at significant height, to reach components. If you or your team will be working six feet or more above the ground, use fall protection. Mitigate the risk of fall-related injuries with equipment like hard hats and harnesses.
Be thorough in your preparation to maximize safety and end results. Explore our selection of safety products to protect yourself and your team when it’s time for installation.
2. Take inventory.
Once you have established safety risks and protocols, do a walkthrough of the area and identify all components to be insulated. Getting up close with the machinery will help you determine the insulation jacket sizes for different parts, locate ID numbers, and gather data from the ID tag.
The ID numbers are on the side of each component. To make installation easier, these ID numbers are matched to their corresponding insulation blankets, which have a “slate,” or scannable ID tag. These tags are created to match each customer’s specific application.
Knowing the parts involved by appearance and number will help guide your installation. Use the ID tags and numbers as references to ensure that you pair the right blankets and components and protect your equipment.
3. Prepare the blanket and cutout.
With essential details in place, you’re nearly ready for installation. Insulation jackets are custom-fitted for each component, so you’ll need to align the cutouts first to ensure a safe and productive installation process. Proper alignment results in:
- Energy and time savings: Because jackets are custom-made at the component level, the right cut will mean less time and energy spent on installation.
- Safer insulation: Properly fitted insulation blankets boost workplace safety for anyone working nearby.
- Easy blanket removal: Fit, plus easy-to-use Velcro connections, make blanket removal a breeze when it’s time for maintenance or replacement.
Be thorough in your measurements so the reusable insulation blankets fit properly. Doing so will benefit you during the installation process, as well as throughout the lifetime of the product.
4. Install the Insulation Blanket.
Now that each blanket cutout is aligned, you will be able to install each on their respective components. Blankets must fully cover the component—with no surface area left exposed—to provide safe and adequate protection.
Throughout the installation, double-check that the insulation blankets fully cover their respective components with no uninsulated areas. If the cutouts need to remain perfectly aligned, ensure that they are, and secure the blankets with Velcro seals.
From here, you can finish securing the blankets. Use D-rings to tighten the insulation blankets to their components for maximum protection, then close each blanket with seal flaps at the end of their cutouts.
Trust MIT and Distribution International for custom solutions.
Do you need removable insulation blankets in your facility? When you take the right precautions and ensure that your materials are prepared, it’s easy to install removable insulation blankets for industrial applications.
At MIT International, a division of Distribution International, we offer removable insulation blankets for projects of all shapes and sizes. That’s because we don’t sell anything off the shelf; each blanket is custom fabricated based on your component measurements. Choose from our selection of Heat Holder and Unipad™ blankets and discover the benefits of using removable insulation blankets to protect your equipment.
Our Crossroads C&I business in Canada also manufactures removable insulation blankets in its Sarnia, ON branch. Learn more about Crossroads C&I's removable and reusable insulation solutions now.
Easily access Distribution international’s comprehensive insulation supply by registering for CustomerConnect. CustomerConnect is our online portal for customers to easily search and request quotes for more than 30,000 products. View our inventory online and select the right insulation for your job with CustomerConnect.
